

Securing Ubuntu with UFW
In this tutorial, we will use Ubuntu 18 server and UFW to secure your server. UFW is an interface to iptables that help you configure a firewall for your Ubuntu VM in ServerStadium. For beginners is difficult to learn how to use a firewall properly with iptables, that is why UFW will make you more easy and comfortable to secure your server.
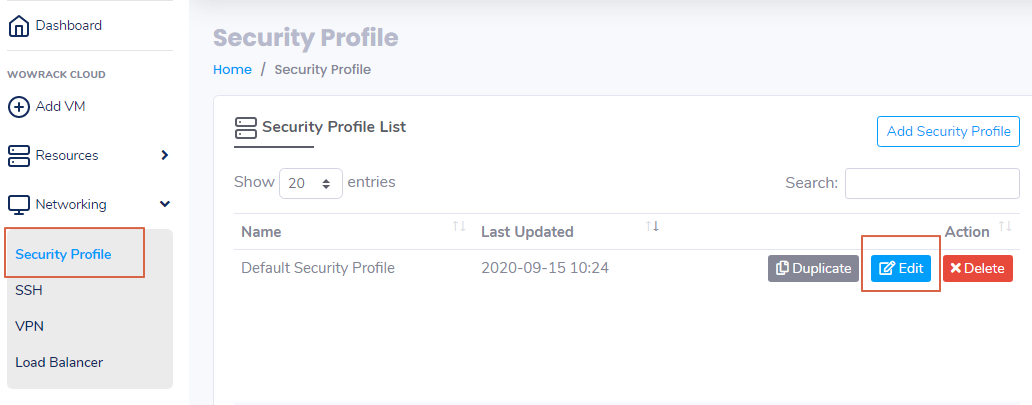
ServerStadium actually has the Default Security Profile that you can use to secure your server. Security Profile in ServerStadium has default open ports like SSH (22), HTTP (80), HTTPS (443), and RDP (3389).
Default Security Profile can be found at Networking – Security Profile.
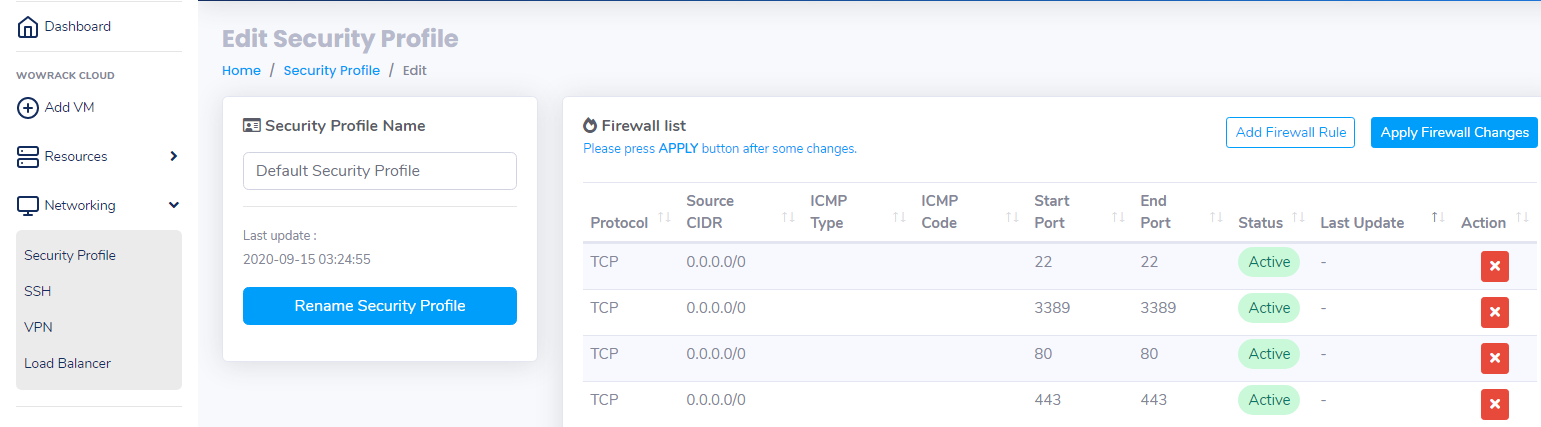
Click Edit of Default Security Profile if you want to know the default open port.
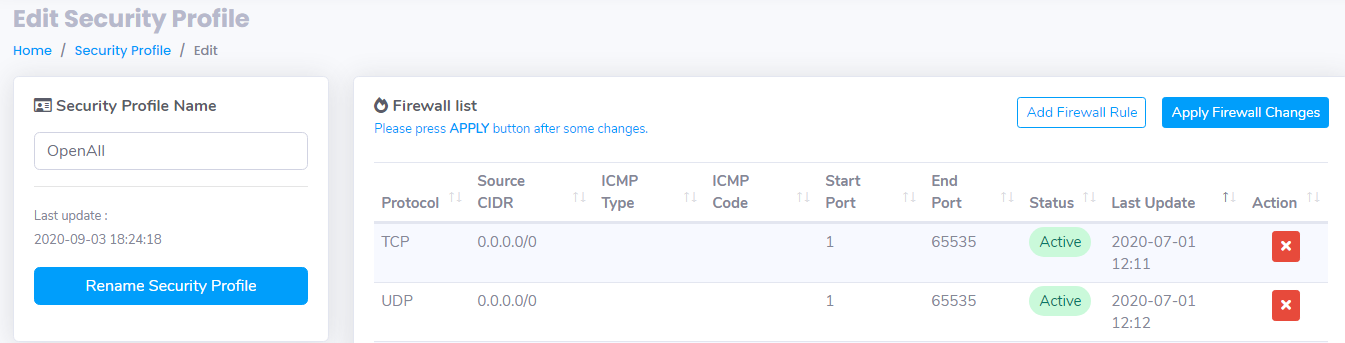
But if you want to use UFW to secure your server, you need to create a new Security Profile that Open All Port.
Click Add New Security Profile – Fill the Security Profile with OpenAll.
Create the Firewall Rules as follow :
After New Security Profile has been created, back to your VM list then choose VM that wants to use UFW.
On Detail Information of the VM, Click Edit on Security Profile then select the OpenAll profile that we created earlier.
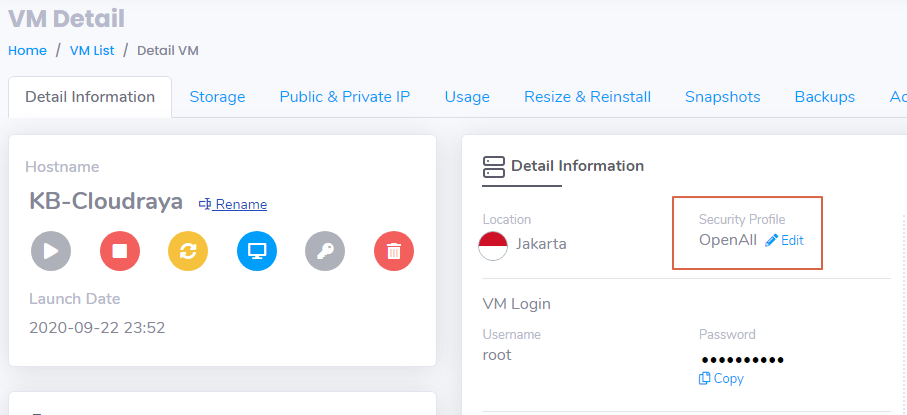
Now your VM is Open to All port, then you are ready to use UFW on your VM.
Installing UFW
Install UFW is very easy, sometimes it already installed on your server. However, if the application doesn’t exist, you can install it with the following command:
# apt install ufw Setting Default Policies
After UFW installed on your server, UFW has default policies to deny all incoming connections to your server and allow all outgoing connections from your server.
It means anyone can’t reach your server from the outside, but your server is able to reach the outside
To set the default UFW, you can use these command
# ufw default deny incoming
#
ufw default allow outgoing

Allowing SSH
After you block all connections, you need to open the SSH port if you want to manage your server.
Usually, every server has a default port that needs to be opened.
For Linux server like Ubuntu, we need to open port 22 for Public or certain IP. But if you have a custom SSH port, you can specify this to use the custom port. Below is the command to open port 22 or ssh
# ufw allow ssh
Enabling UFW
Everything has been configured, now we can enable UFW on the server:
# ufw enable
Now port 22 / ssh of your server has opened. You can access it from everywhere. We can verify by using the following command :
# ufw status numbered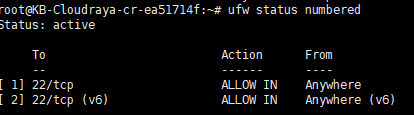
Allowing other connection
After we secure your server only permit port 22, we can allow another port that we want to publish to the outside.
UFW has several way to open the connection, like open port, specific port range, specific IP Address / Subnets, specific Network Interface
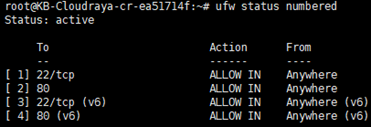
On previous tutorial we have learned how to open port ssh using UFW. You can also do this to open port 80 :
# ufw allow 80
Now we can see port 80 is Allow from everywhere
Specifying Range Port
But how if you have port range that want to open? You don’t need to open the port one by one, but you can open it by using range port.
On this example, we want to open port VNC port from 5900 – 5905 :
# ufw allow 5900:5905/tcp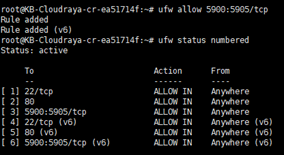
Specifying IP Address
Sometime we need to specify certain IP Address that allow to access your server because you don’t want your server get brute force or DDOS. By only allowing specify certain IP that can access your server, it will make the server more secure.
You can use this command to allow from IP Address
# ufw allow from 163.53.193.158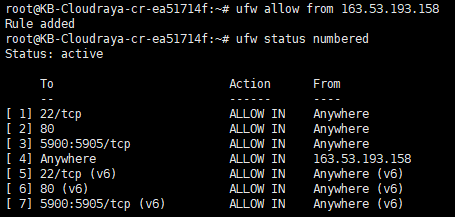
Or you can more specific like allow IP to access port 80
# ufw allow from 163.53.193.158 to any port 80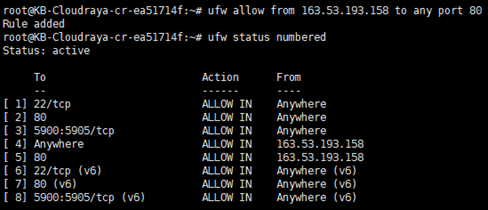
We also can allow the subnet of IP Addresses of network by using CIDR notation.
You want to allow 202.115.115.0 to 202.115.115.254 you can use :
# ufw allow from 202.115.115.0/24 to any port 80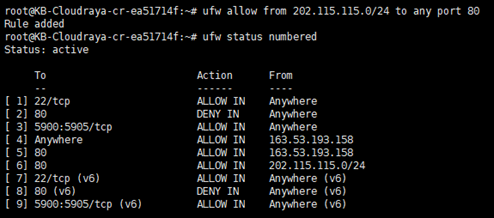
Denying Rule
After we have allowed some port or IP Address to your server, sometime we need to deny the connection.
Deny connection is needed if there is attacker attacks your application then you want block the attacker connection.
You can imagine you have a website but there is a website attack that make your website fell so slow.
We can block the IP Address of attacker after found in your website log.
To block the connection we can replace allow rule to be deny rule
# ufw deny 80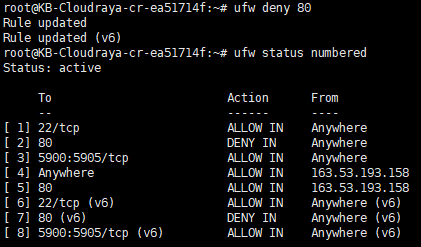
Deleting Rules
Now we already know how to create allow or deny rule.
Knowing delete a rule that we have create is needed if we don’t need it again.
In this tutorial, we will delete firewall rule no.2 (port 80 / http)
You can use the following command :
# ufw delete 2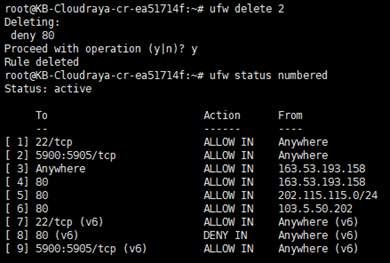
Now you can see port 80 on rule no.2 has been deleted.
For additional information, UFW is working sequentially. Every time we add new rules, it will be added to the bottom of the existing ones.
Let say you have a deny rule for port 80 on number 2 as follow :
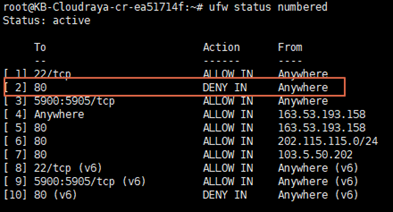
If we deny rule for port 80 in number 2, it will block all connection port 80 for All IP Address.
So, the allow rule for port 80 from certain IP is not working.
To re-order the blocking rule, we can delete rule number 2
# ufw delete 2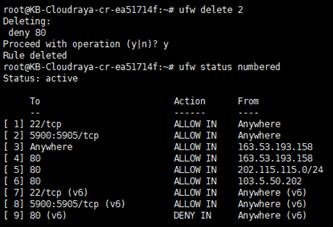
Then we add deny rule port 80 after rule number 6.
It will add deny rule for port 80 after allow rule port 80 on number 6.
# ufw deny 80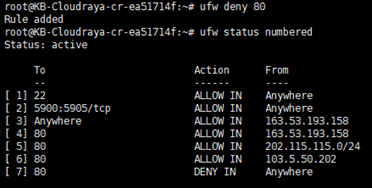
Disabling UFW and Resetting UFW
For some a reason you want to disable UFW, you can disable ufw with below command
# ufw disable
Or you want to start over the rule with a new rule, we can reset it using this command
# ufw reset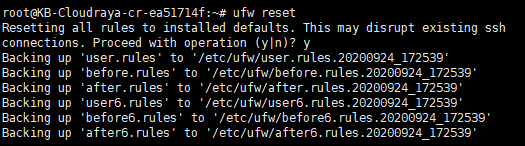
Reset command it will delete all rules and disable UFW.
Right know, you know how to configure firewall in Ubuntu with UFW.
With UFW, securing your server very easy.
Please make sure only allow the necessary port to your server to make your server more secure.
If you have some question about UFW and Ubuntu, please submit your issue to our support. We will be more than happy to assist you.