

Establishing a VPN in ServerStadium Cloud
Imagine you are in a public area, and you need to access your server in ServerStadium Cloud. You want to secure the connection between you and the server for safety and privacy. You can use a VPN to access your server in ServerStadium Cloud as a solution.
Establishing a VPN in ServerStadium Cloud is easy because you only need three steps to create a VPN in ServerStadium Cloud
There are many benefits when you use Cloud VPN in ServerStadium, such as:
- Your traffic will be encrypted when using Public Wifi
- No needed IT skills when you create a VPN in ServerStadium because we will do it for you.
- Also, No software installs and maintenance. You just need to enable the VPN feature and create a VPN user
Below are the three steps to establish a VPN in ServerStadium Cloud:
Step 1:
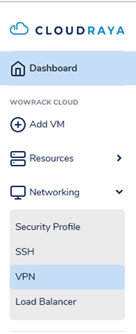
You can login into the control panel at https://cp.serverstadium.com. On the left of the dashboard, click “Network” then Choose “VPN”
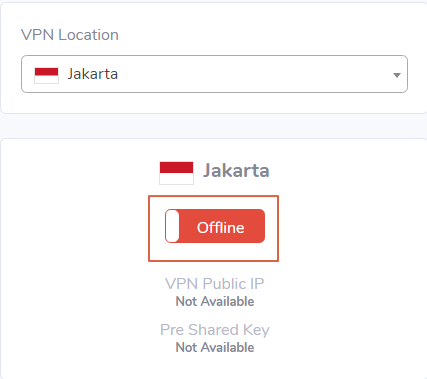
After you choose “VPN”, the main page will be displayed a VPN configuration:
Step 2:
Your VPN Location is located at Jakarta. Click the “Offline” red button to be “Online” green button.
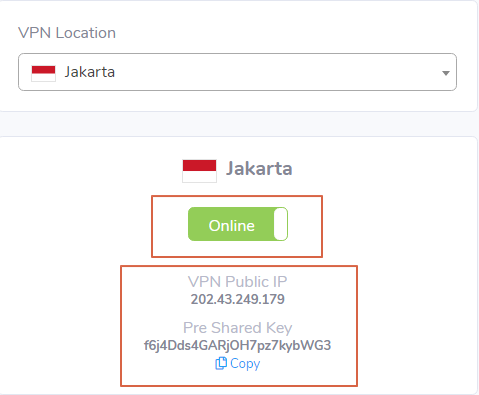
After the VPN is “Online”, it will be displayed the VPN Public IP and Pres share key.
Please keep it on your note because you will use it when you want to connect to VPN
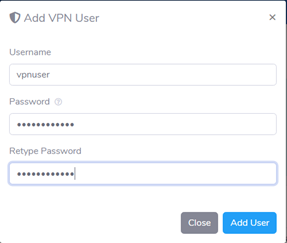
Step 3:
Now your VPN is Ready; the last step is to create a VPN user.
You can click “Add VPN User” , fill your Username and Password of your VPN User
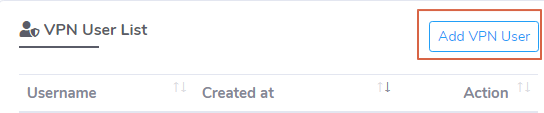
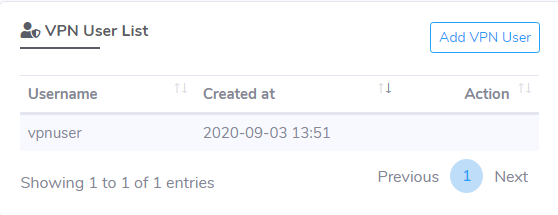
Click “Add User” then your VPN user will be listed as follow
It’s easy, right? Now that your VPN is ready, we will show you how to connect the VPN using Windows 10.
Connect to ServerStadium Cloud VPN from Windows 10
Please make sure you have saved VPN Public IP and Pre-shared Key.
Because we need it when creating a VPN Profile on your personal computer
Below is steps that you can follow:
Step 1:
Select “Start” button, then select “Setting”, and choose “VPN” because we want to create a VPN profile as “ServerStadium VPN” on your PC.
After that, “Add a VPN connection” and fill in the required fields as follow :
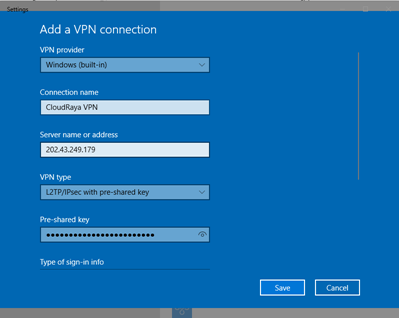
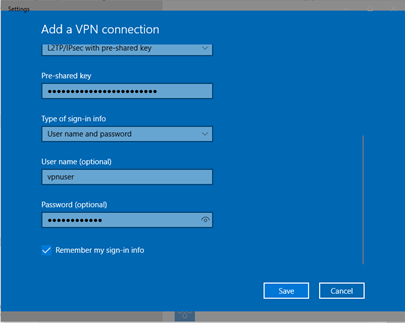
Click Save
After the VPN profile is created, you will get an error as follows when trying to connect to ServerStadium VPN.
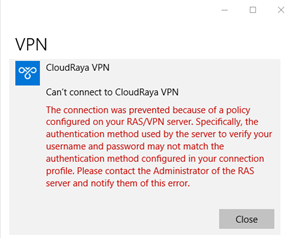
To resolve this error message, you need to enable MS-Chap v2 on your VPN Profile. We will resolve it in Step 2.
Step 2:
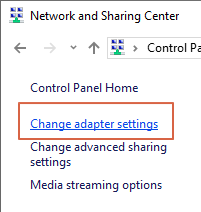
To enable MS-Chap v2, Select “Control Panel” then click “Network and Sharing Center“. Click “Change Adapter Settings“
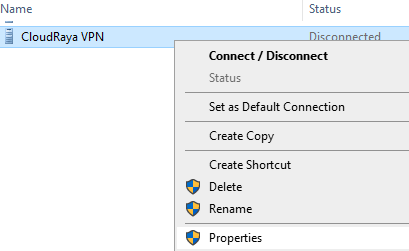
Right click the VPN Profile, then choose Properties
ServerStadium VPN properties will be displayed. Click “Security” tab to enable MS-CHAP v2
Tick “Allow these protocols” and “Microsoft Champ version 2” then Click OK

Step 3:
After you enable MS-Chap V2, you are ready to connect the VPN again.
Click “Setting” – VPN then Click “Connect” on ServerStadium VPN.
Please wait for a while until the VPN Profile “Connected”

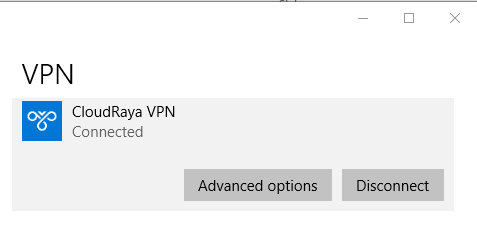
Viola, now you are connected to VPN in ServerStadium Cloud.
You can access your VM in ServerStadium using their Internal IP Address.
If you have an issue when connecting to the VPN, please submit your issue to our support. We will be happy to assist you.