

Implementing Redis HA and Auto-Failover on ServerStadium
INTRODUCTION
Redis is an open-source, in-memory, key-value data store most commonly used as a primary database, cache, message broker, and queue. Redis delivers sub-millisecond response times, enabling fast and powerful real-time applications in industries such as gaming, fintech, ad-tech, social media, healthcare, and IoT.
ARCHITECTURE
The Infrastructure layout of Redis multi-cluster is like the picture below.
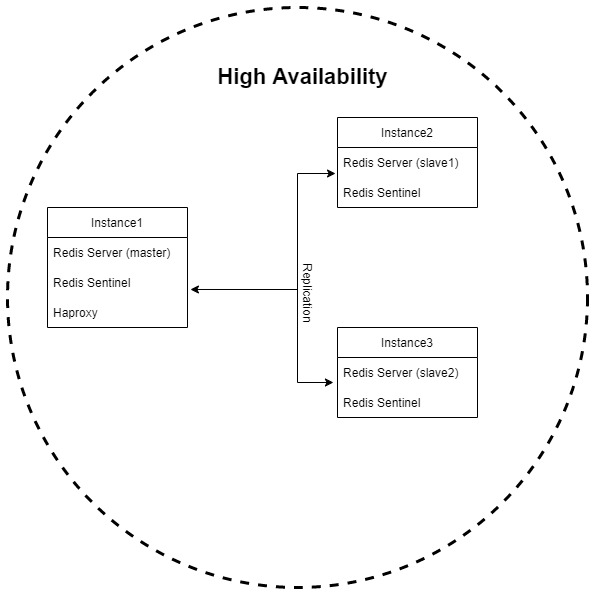
The initial setup will need three instances that act as the Redis master-slave.
One instance acts as the master, and the rest instances will act as the slave that replicates the data from the Redis master.
The Redis sentinel monitoring on each instance will accommodate the high availability component.
The Redis sentinel will then change the Redis configuration and determine which instance stands as master or slave.
By default, only the Redis master can read and write, whereas the slave instances can only do the read command.
STEPS
Spin Up New VMs
NOTE: The setup below is the setup used in the tutorial. Please adjust the resources based on the price you are affordable to spend.
| Instance 1 | Instance 2 |
| OS: Ubuntu 22.04 Jammy vCore: 2 Memory: 2 GB Disk: 20 GB Public IP: yes Private IP: 3 |
OS: Ubuntu 22.04 Jammy vCore: 2 Memory: 2 GB Disk: 20 GB Public IP: No Private IP: 1 |
| Instance 3 | |
| OS: Ubuntu 22.04 Jammy vCore: 2 Memory: 2 GB Disk: 20 GB Public IP: No Private IP: 1 |
Machine Tuning
Disabling THP on each machine
echo never > /sys/kernel/mm/transparent_hugepage/enabledEnabling overcommit_memory
$ echo 1 > /proc/sys/vm/overcommit_memory
## Set it persistently
$ echo 'vm.overcommit_memory = 1' >> /etc/sysctl.conf
Set swappiness at the least weight
$ echo 1 > /proc/sys/vm/swappiness
## Set it persistently
$ echo 'vm.swappiness = 1' >> /etc/sysctl.conf
Install Redis on The Related Machine
Add the repository to the apt index, update it, and then install it.
curl -fsSL https://packages.redis.io/gpg | sudo gpg --dearmor -o /usr/share/keyrings/redis-archive-keyring.gpg

echo "deb [signed-by=/usr/share/keyrings/redis-archive-keyring.gpg] https://packages.redis.io/deb $(lsb_release -cs) main" | sudo tee /etc/apt/sources.list.d/redis.list

sudo apt-get update
sudo apt-get install redis redis-sentinel
Obtain Secondary Private IP and Attached it to the Redis Master
- Navigate to your Redis Master machine from the ServerStadium portal
- Click the Public & Private IP tab, then attempt to Acquire New Private IP
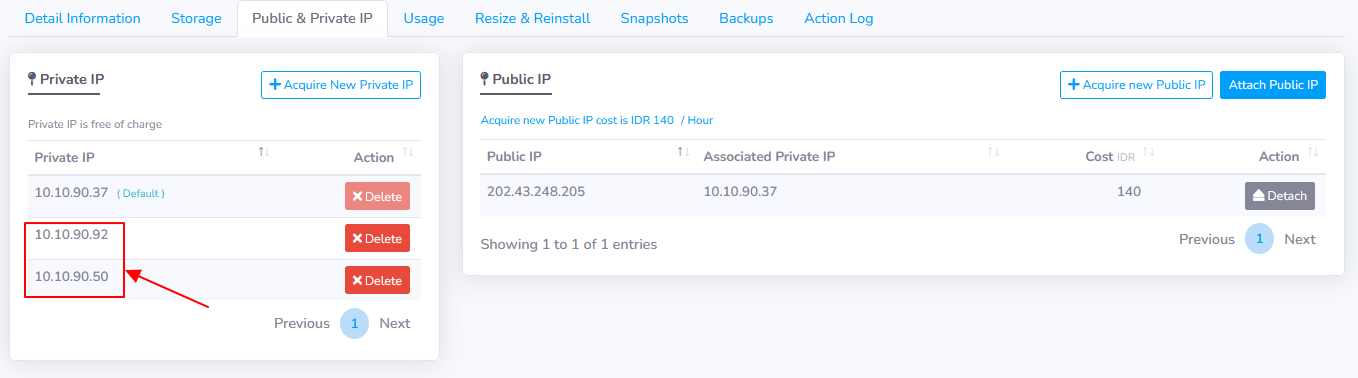
- Manually attach the new acquired private IP to the VM
~# ip addr add 10.10.90.92/24 dev <your interface name>
~# ip addr add 10.10.90.50/24 dev <your interface name>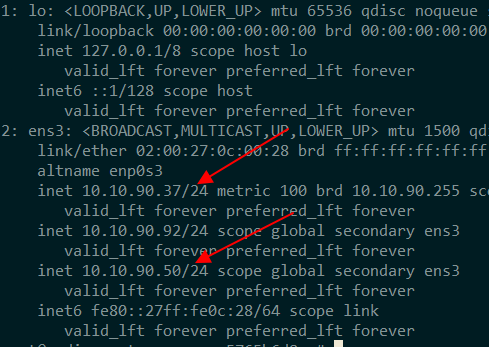
Configure Redis Server
Add/overwrite the following config to your initial /etc/redis/redis.conf master
bind 127.0.0.1 <private IP>
protected-mode no

# add authentication feature for security
requirepass <your password>

# will be used to authenticate to master during failover
masterauth <your password>
masteruser <authoritative user>

# enable AOF feature
appendonly yes
Add / overwrite the following config to your initial /etc/redis/redis.conf slaves
bind 127.0.0.1 <private IP>
protected-mode no

# will replicate the state from the master instance
replicaof <master ip> <master port>

# add authentication feature for security
requirepass <your password>

# will be used to authenticate to master during failover
masterauth <your password>
masteruser <authoritative user>

# enable AOF feature
appendonly yes
When done, restart your Redis service on each instance.
systemctl restart redisConfig ACL to Set The Authoritative Redis User
Login to your Redis instance using the Redis-CLI command and do the AUTH using the previous password that has been set.
redis-cli -p 6379
127.0.0.1:6379> AUTH default <redis password>

## Example of the ACL
ACL SETUSER admin on allchannels >R3plicationP4sswd ~* &* +@all

## write config to the file
CONFIG REWRITE
Make sure the above ACLs are set to each Redis instance.
Configure Redis Sentinel
Add / overwrite the following config to your initial /etc/redis/sentinel.conf instances
protected-mode no
sentinel monitor mymaster <master IP> 6379 2

# Example seconds threshold to perform failover
sentinel down-after-milliseconds mymaster 15000
sentinel failover-timeout mymaster 30000

# Example of redis sentinel authentication
sentinel auth-pass mymaster R3plicationP4sswd
sentinel auth-user mymaster admin
When done, restart your Redis-sentinel service on each instance.
systemctl restart redis-sentinelConfigure Haproxy to Actively Check Redis Auto-Failover Process
Install Haproxy on Redis master node
~# apt-get install haproxy -yAdd the following setup to Haproxy Config
listen stats
        bind *:8080
        stats enable
        stats hide-version
        stats refresh 30s
        stats show-node
        stats auth appadmin:Asdf1234
        stats uri /stats


# redis block start

defaults REDIS
        mode tcp
        timeout connect 3s
        timeout server 30s
        timeout client 30s

frontend front_redis_master
        bind 10.10.90.92:6379 name redis
        default_backend back_redis_master

frontend front_redis_slave
        bind 10.10.90.50:6379 name redis
        default_backend back_redis_slave

backend back_redis_master
        option tcp-check
        tcp-check connect
        tcp-check send AUTH\ admin\ R3plicationP4sswd\r\n
        tcp-check send PING\r\n
        tcp-check expect string +PONG
        tcp-check send info\ replication\r\n
        tcp-check expect string role:master
        tcp-check send QUIT\r\n
        tcp-check expect string +OK

        server redis-a 10.10.90.37:6379 check inter 1s
        server redis-b 10.10.90.227:6379 check inter 1s
        server redis-c 10.10.90.147:6379 check inter 1s

backend back_redis_slave
        option tcp-check
        tcp-check connect
        tcp-check send AUTH\ admin\ R3plicationP4sswd\r\n
        tcp-check send PING\r\n
        tcp-check expect string +PONG
        tcp-check send info\ replication\r\n
        tcp-check expect string role:slave
        tcp-check send QUIT\r\n
        tcp-check expect string +OK

        server redis-a 10.10.90.37:6379 check inter 1s
        server redis-b 10.10.90.227:6379 check inter 1s
        server redis-c 10.10.90.147:6379 check inter 1s


# redis block end
Save the configuration and restart the Haproxy service
systemctl restart haproxyFailover Test
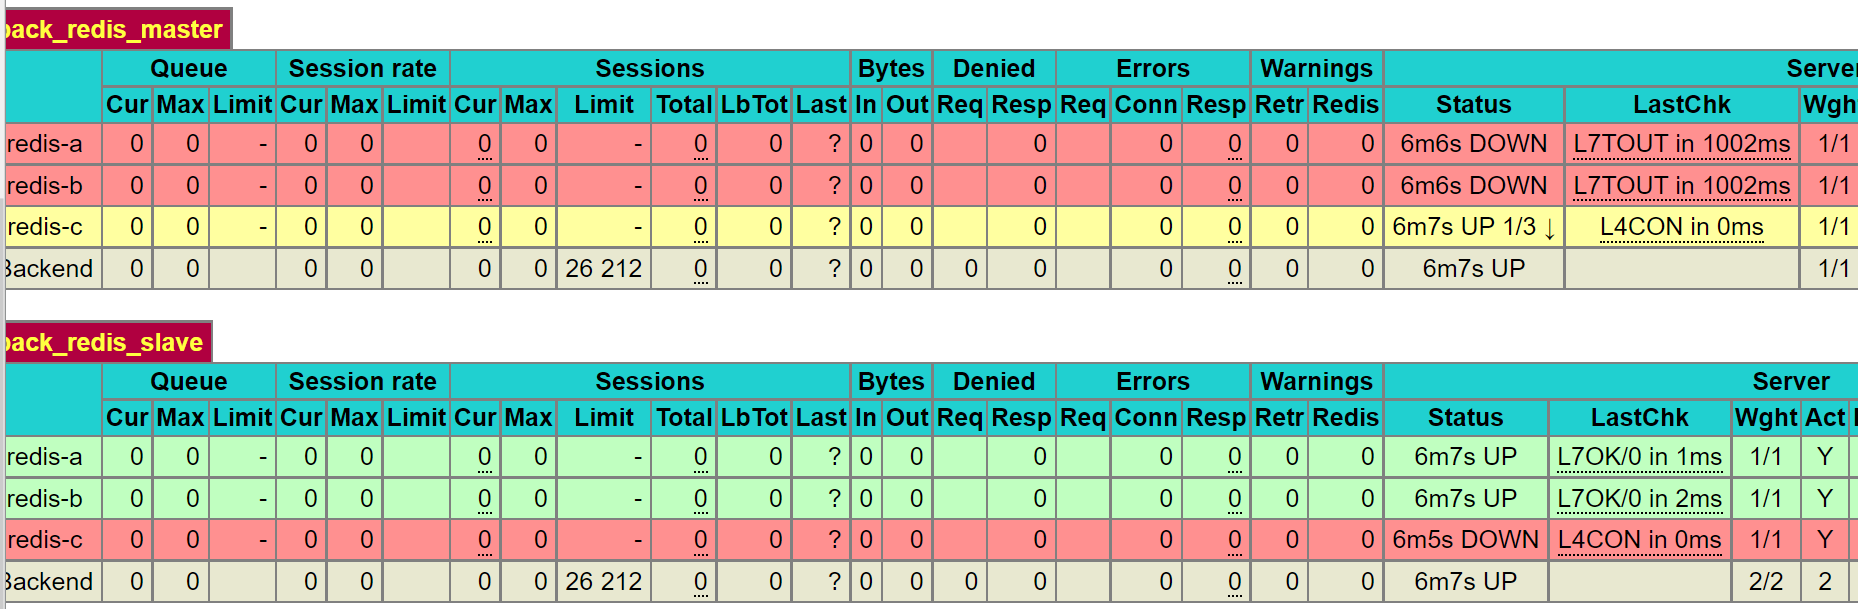
The failover test section is fulfilled by purposely stopping the Redis service on the master instance.
As an expected result, the Redis sentinel will change the config on the Redis master and promote one of the slaves as the new master.
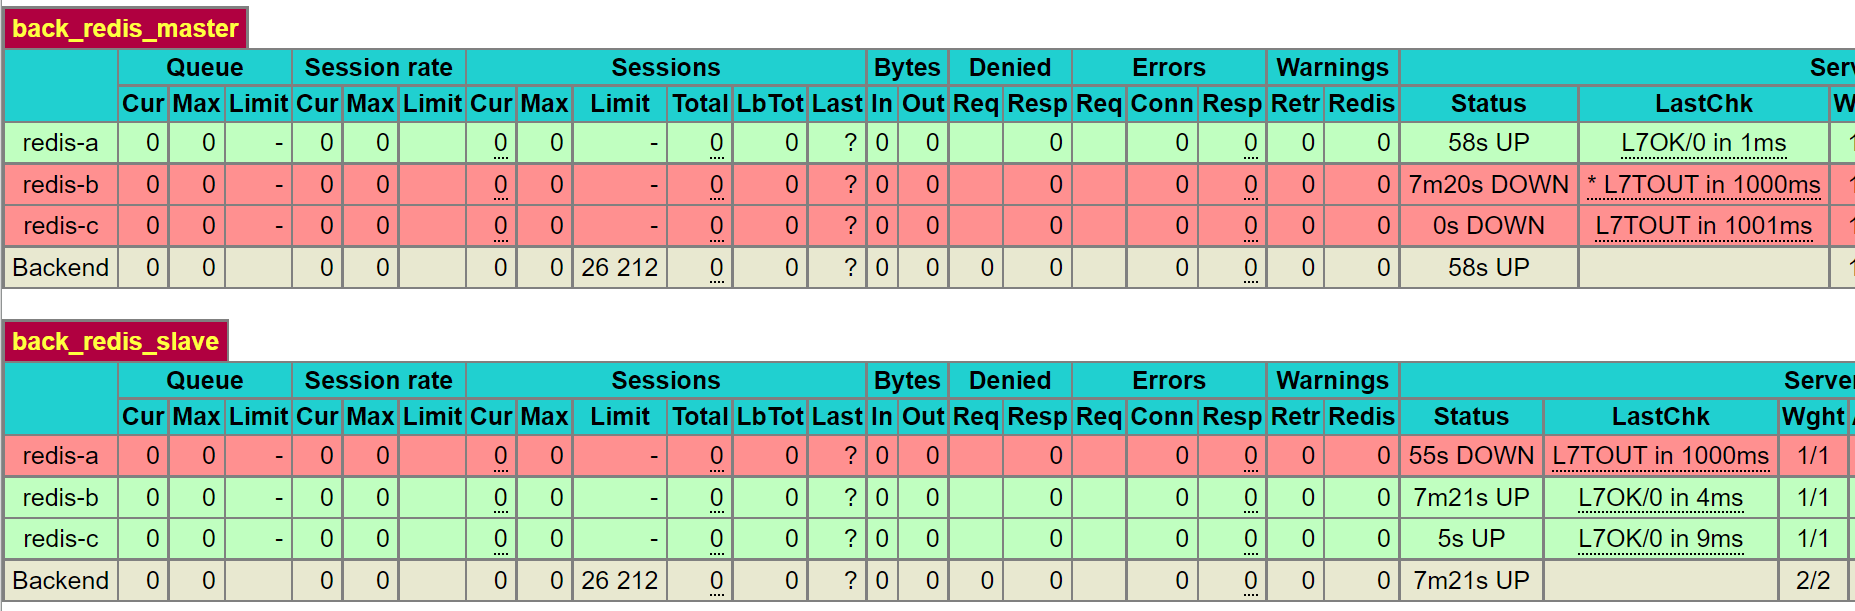
The picture below is a Haproxy TCP-check result against the Redis master and the Redis slave role.

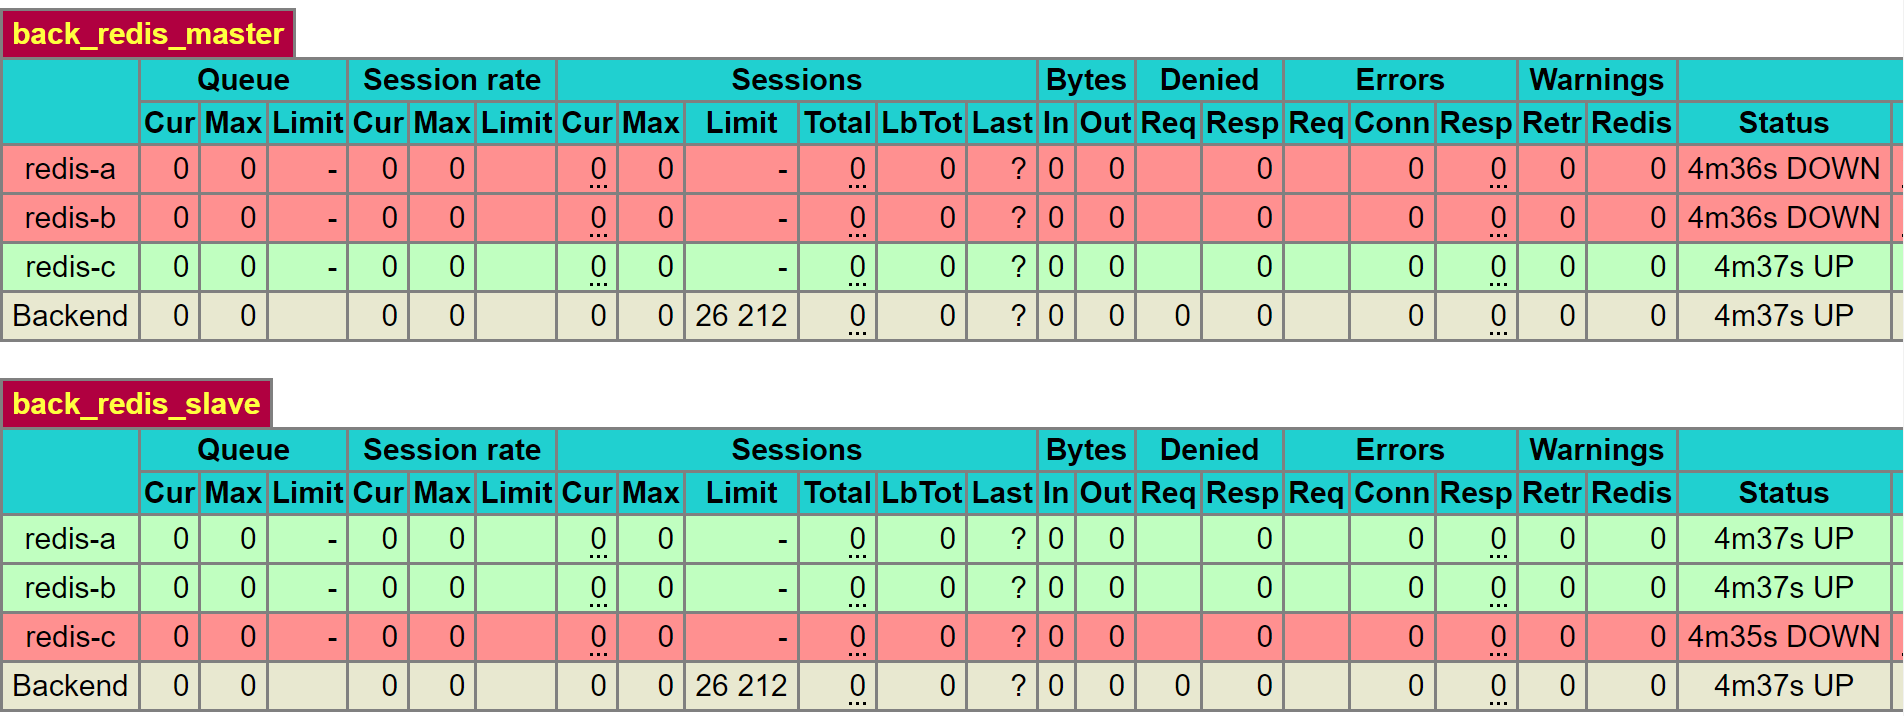
During the master promotion, the previous master instance will turn yellow (warning alert), and the successfully promoted instance will turn green.
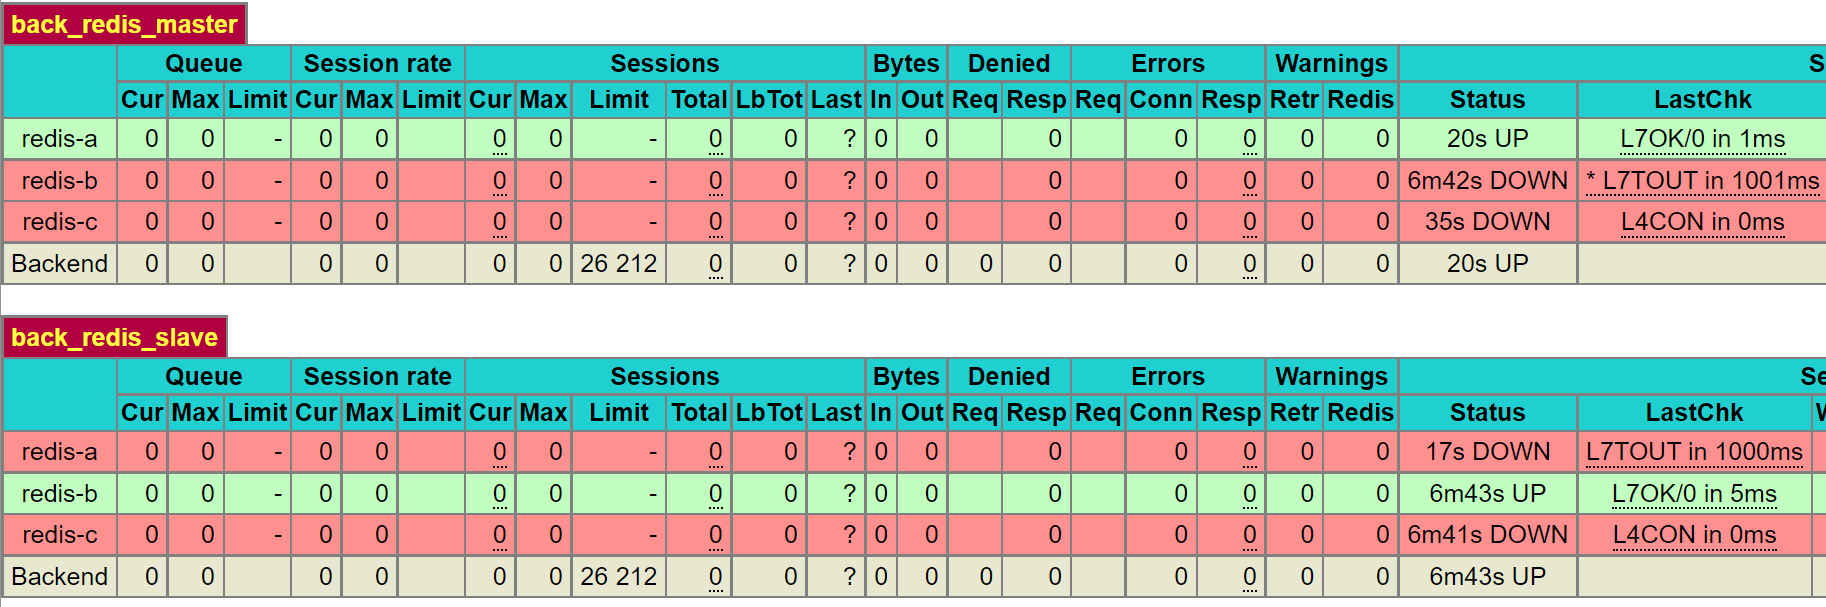
The picture above shows the Redis instance successfully promoted to master. The Redis-c is expected to be down because the service was stopped intentionally and has not started yet.
The Redis instance C will be promoted to a slave as soon as the Redis service is started.
CONCLUSION
We have learned how to implement Redis HA and Auto-Failover in ServerStadium. Find more tech tutorials and informative articles in ServerStadium’s Knowledge Base Or, even better, you can go to ServerStadium’s Cloud Services to get started!