

Create VM, Custom Package, Reinstall VM, and Adjusting Security Profile
There is a lot of basic knowledge you should know while managing your VM through the ServerStadium panel. In this part, we will guide you with the important VM and Firewall creation knowledge in the ServerStadium panel. Let’s get started!
Creating A Virtual Private Server on ServerStadium
Before we begin, please follow the instruction below to deploy your virtual machine in ServerStadium, Deploying a Virtual Machine in ServerStadium. In the package selections, you can choose either a standard or custom package. The range of the standard packages varies. Starting from x-small (1024 MB memory, 1 core CPU, 3072 GB bandwidth, 20 GB SSD and public IP included) to xlarge-r32 (32768 MB memory, 8 core CPU, 3072 GB bandwidth, 320 GB SSD and public IP included). However, you can always choose your desired package by specifying it in the “custom package” selection.
Please choose how much the resource will take by sliding the resources button.

Then, you can proceed with Step 3, if you have finished with the current resource selection.
Next, click Create VM button to provision and launch the VM according to your desired time.
Reinstall VM in ServerStadium
Sometimes, you need another operating system to work with your VPS resources. Worry not! Since ServerStadium has the capability to reinstall the operating system on top of existing resources.
Please follow the instruction below to reinstall the operating system of your VPS.
- In the ServerStadium panel, navigate to Resources > VM List
- Then, please select the virtual machine you want to reinstall. You should see something similar in this picture

- After that, choose Resize and Reinstall tab
- In the Reinstall menu, please select the operating system you would like to install
- Please click the Reinstall button after selecting your desired operating system.

- Wait until the reinstallation is finished, and Viola! Your new installed virtual machine is ready to use
Adjusting the Security Profile
The security profile feature lets you define which port should be opened before facing the virtual machine. It can also specify the allowed source IP address when connecting with the VM port.
Imagine a firewall sitting between your VM and the outside world; the Security Profile will choose which in-going traffic should be allowed to go through the virtual machine.
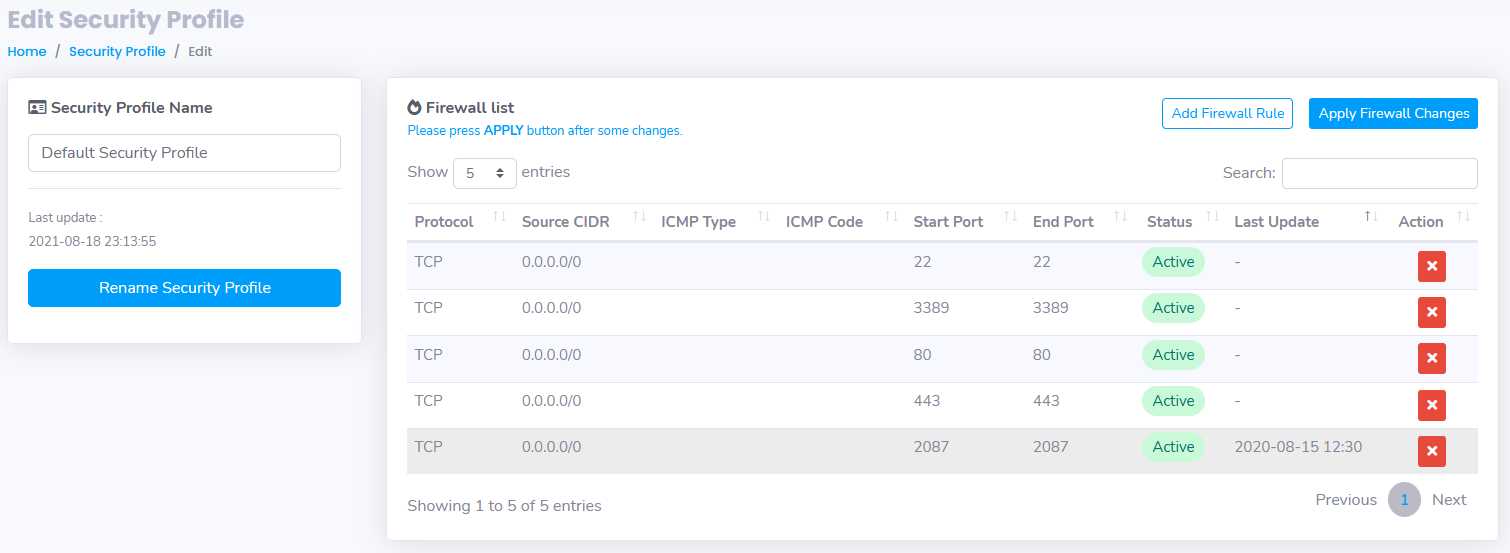
In an early creation, the virtual machine uses a standard security profile that consists of some standard ports. Those ports open specific services to the outside world.
- Port 22 : Allow Secure Shell (SSH) service to remote access your Linux machine
- Port 3389 : Allow Remote Desktop Connection to be established to your Windows machine
- Port 80 : a known port for HTTP connection (web service)
- Port 443 : a known port for HTTPs, the secure version of HTTP connection run by web service
Here are the steps for adjusting your Security Profile:
- Navigate to Networking > Security Profile from your ServerStadium portal
- Please select the security profile from the list and click Edit (e.g, Default Security Profile). This is what the Default Security Profile look likes
- Then, click Add Firewall Rule
- Please specify the source IP address, protocol, and the range of the ports, then click Create New Firewall button from the dialog box.
- You need to Apply the Firewall Changes, if the selected security profile belongs to the virtual machine
Conclusion
We have successfully set up and configured our VM using ServerStadium Panel. Your machines are now ready to go! Please use them for your the need of your hosting purposes or anything you want to. Lastly, kindly check our other articles here if you need another article related to ServerStadium VM.