

Backup & Sync Local and Remote Directories Using RSYNC
There are many backup methods available on ServerStadiums’s Knowledge Base. In this tutorial, we will bring another backup & synchronization topic. Here, we will learn how to synchronize directories and certain files from our main VM to another. Similar to deploying DRC from our main VM.
The method we will bring in this tutorial is by using RSYNC. What is RSYNC, the command line, and the example of its application? Let’s find out.
What is RSYNC?
RSYNC is one of the powerful synchronization tools but quite easy to use. RSYNC runs on devices with Linux Based OS (Ubuntu, CentOS, Debian, etc.).
By using RSYNC, we can synchronize any file or folder from one device (source) to one or more other devices (destination).
The file transfer method on RSYNC can be through an SSH (secure shell) or RSH (remote shell) connection. Or even directly via the RSYNC daemon, so there will be an open RSYNC port on our device that will talk directly to an RSYNC client on another host.
However, this tutorial will discuss how to use RSYNC from SSH connection; it will be more secure and, most importantly, encrypted.
One of the capabilities of RSYNC is to synchronize which files differ between source and destination. (incremental backup). With this, we don’t need to copy files fully in every synchronization process. This can save more bandwidth and your network, especially if you want to synchronize 1 device and another over the public network.
With RSYNC, we can also synchronize files and folders across OS, as long as they are still in one Linux distribution.
RSYNC Command Format
Here is the command structure for RSYNC usage:
| rsync [optional modifiers] [source folder location] [destination folder location] |
There are optional modifiers that function to determine the action of our command. A group of main options from RSYNC includes:
▶️ -r
Recursive. Include directories and subdirectories as well as any files contained within the subdirectories.
▶️ -a
Archive. The complete version from –r, where –a is an alias from the group of options: -rlptgoD
Include the recursion option, preserves authorizations, file modification date/time, and the group as well as user ownership.
▶️ -v
Verbose. Displays a list of files that were copied during the sync process.
▶️ –delete
Delete, if the destination directory includes a folder or file which is missing from the source directory, delete it (can be done vice versa).
▶️ -z
Compress the files that we will synchronize so that the file size can be much smaller. RSYNC is smart enough to determine which file types need to be compressed or not
▶️ –exclude
Specify which file or folder patterns we want to exclude from the sync process.
▶️ –include
The opposite of the –exclude option, it defines a pattern of file or directory names to include in the sync process. Usually, users combine the “option include” with the “option exclude”.
▶️ –dry-run
Only shows what process your command will do without actually doing it.
▶️ –progress
It displays the Kb transferred and the Kb/s transfer rate.
Those are some of the common RSYNC options that we can use. We can choose based on our needs and goals. But, in my personal opinion, what is essential to our need is -a -v and –progress so that the files and folders that are synchronized are exactly the same as the source destination; we can check which files will be processed and also see the transfer rate.
Installing RSYNC
RSYNC is generally installed as a default feature on devices with Linux-based OS. However, it is possible that your device doesn’t have it yet.
If so, you can install RSYNC by running this command:
| apt-get install rsync |
In this tutorial, we are going to use 2 VMs from ServerStadium with Ubuntu as the OS. Don’t worry for those who use other Linux distributions; the operational method will be similar. If there’s a minor difference, it would be just on the RSYNC installation process.
Both of the VMs will be in 2 different regions, Jakarta and Surabaya, to get a better experience of the real DRC conditions.
Implementation
After we discover the command format and how to install RSYNC, let’s work try it and make a sample test.
▶️ Performing Local Backups
As the first test, let’s try to synchronize one directory with another, but still in the same VM.
| Local Host – Source Dir ➖➖➖➖➖➖➖➖➖➖➖➖➖➖➖➖➖➖ Files and folder list:  RSYNC SYNTAX root@local-host:/usr/trial# rsync -avp source-dir / destination-dirsending incremental file list |
| Local Host – Destination Dir ➖➖➖➖➖➖➖➖➖➖➖➖➖➖➖➖➖➖ Files and folder list: 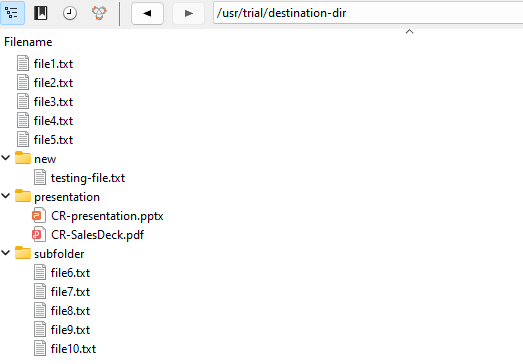 |
↳ We can use the command above to synchronize all files and subfolders from the source destination. In this tutorial, I will use additional options -v, -p to check what files will be synchronized, and how’s the progress going.
You may notice that there is a trailing slash (/) at the end of the first argument in the syntax, that this (/) specifies the contents of source dir.
Without the trailing slash, source dir, including the directory, would be placed within the destination dir. The outcome would create a hierarchy like the following:
| Local Host – Destination Dir ➖➖➖➖➖➖➖➖➖➖➖➖➖➖➖➖➖➖ Files and folder list: 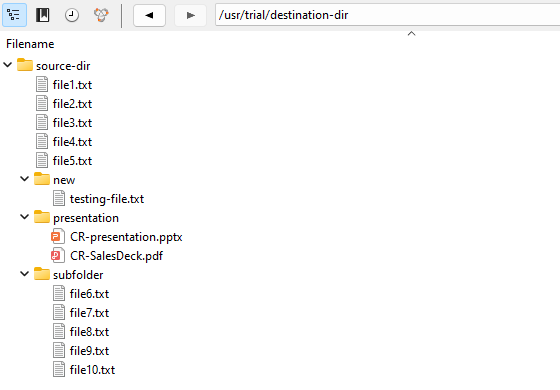 |
You can adjust it based on your project’s needs and goals.
▶️ Performing Backup to Remote System
Now we can jump to one of the main capabilities of RSYNC, which is doing a backup and synchronization within the local devices towards our other devices (remote system).
| Local Host ➖➖➖➖➖➖➖➖➖➖➖➖➖➖➖➖➖➖ Files and folder list: 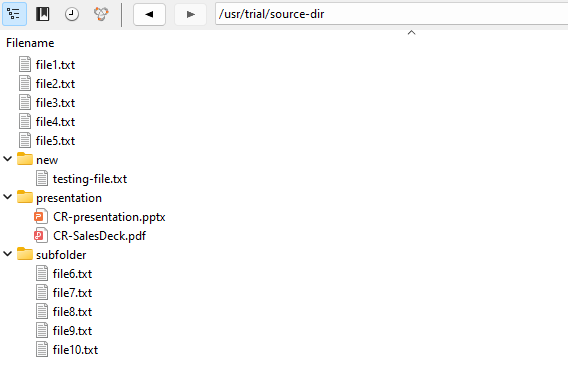 RSYNC SYNTAX root@local-host:/usr/trial# rsync -avp source-dir/ root@remote-host:/usr/trial/destination-dir sending incremental file list |
| Remote Host ➖➖➖➖➖➖➖➖➖➖➖➖➖➖➖➖➖➖ Files and folder list: |
↳ To sync with a remote system using RSYNC, you need SSH access configured between your local and remote machines and RSYNC installed on both systems. After you have the SSH access verified between the two machines, you can sync the source-dir folder to a destination-dir folder that is on the remote machine.
To avoid entering passwords repeatedly while the SSH access between the local and remote is processing, you can configure the SSH key within the two devices.
For those of you who may not know how to connect 2 systems using the ssh key, we will discuss it in a different article.
Besides synchronizing the local device to the remote device, we can also do the reverse activity by synchronizing the remote device with our local device. For the syntax, we can simply reverse it.
| root@local-host:/usr/trial# rsync -avp root@remote-host:/usr/trial/source-dir/ destination-dir/ |
▶️ Using Exclude Options
RSYNC also has the ability to filter which files or folders we want to exclude in the synchronization process. Yes, we can use the –exclude option.
| Local Host ➖➖➖➖➖➖➖➖➖➖➖➖➖➖➖➖➖➖ Files and folder list:  RSYNC SYNTAX root@local-host:/usr/trial# rsync -avp –exclude=*.txt source-dir/ root@remote-host:/usr/trial/destination-dir sending incremental file list |
| Remote Host ➖➖➖➖➖➖➖➖➖➖➖➖➖➖➖➖➖➖ Files and folder list: 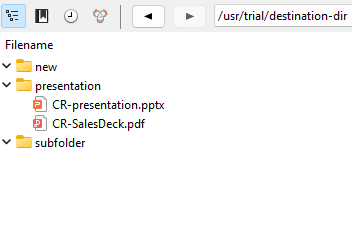 |
↳ So, in the sample, we will exclude the type file .txt from the synchronization process.
If you want to add another exclude condition, You can use the following array:
| root@local-host:/usr/trial# rsync -avp –exclude={“*.txt“,”*.jpg”,”/presentation”,”/new/*”} source-dir/ root@remote-host:/usr/trial/destination-dir |
↳ So, in the above sample, we will exclude the type file .txt, .jpg, folder presentation, and what’s inside the new folder from the synchronization process.
▶️ Using Exclude & Include Options
Besides exclude, we are also able to filter with 2 direct conditions in the synchronization, include certain condition, and exclude other condition. We can also combine argument –exclude and –include into 1 command.
| Local Host ➖➖➖➖➖➖➖➖➖➖➖➖➖➖➖➖➖➖ Files and folder list: 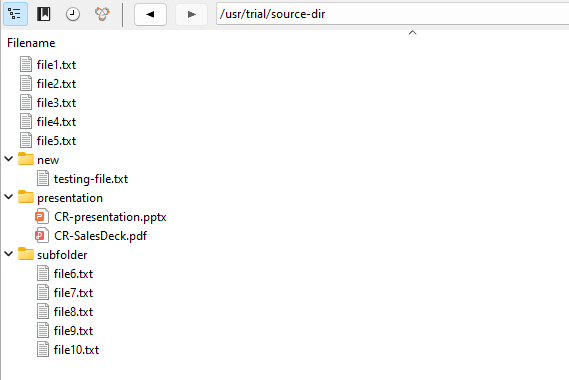 RSYNC SYNTAX root@local-host:/usr/trial# rsync -avp –include=testing-file.txt –exclude={“*.txt“,”*.jpg”,”/presentation/“,”/new/*”} source-dir/ root@remote-host:/usr/trial/destination-dir sending incremental file list |
| Remote Host ➖➖➖➖➖➖➖➖➖➖➖➖➖➖➖➖➖➖ Files and folder list: 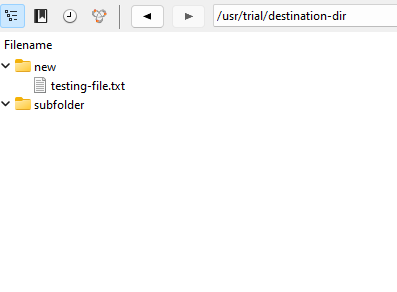 |
If we see the output, the testing-file.txt is still synchronized even though they include in the condition of exclude *.txt dan /new/*. The subfolder is still synchronized even though what’s inside is not synchronized because it’s containing .txt file.
So, to use this option, make sure you put the condition you want to run first. Then, other conditions will be put behind it. (Include some, exclude the rest)
▶️ Multiple Destinations Synchronization
Because the natural method of RSYNC is to work on point-to-point synchronization, so there is no default command from RSYNC to conduct multiple destination synchronization.
However, we can do it with manual techniques. One of the ways to do it is by using the help from the command ‘for’ loop.
This is how to write Syntax Structure ‘for’ loop in providing RSYNC multiple destinations:
| $ for dst in [destination folder location 1] [destination folder location 2] [destination folder location ..] > do rsync [optional modifiers] [source folder location] $dst > done |
And for the sample implementation can be done as follows:
| root@local-host:/usr/trial# for dst in root@remote-host-1:/usr/trial/destination-dir root@remote-host-2:/usr/trial/destination-dir do rsync -avp source-dir/ $dst done |
Common RSYNC Usage in Real-Life Conditions
The RSYNC usage in the real-life conditions are unlimited; it includes these activities:
- Backup and DRC for the website/web application asset
- Backup to disk or usb stick
- Full server migration from 1 VM to another VM. Yes, it is a great potential from RSYNC that is very possible to implement. For those who need help with this migration level, our support team can help you from our Manage Service. Feel free to schedule a consultation with us.
- And many others. You can determine the conditions yourself for activities related to synchronization and backup on Linux-based OS.
Conclusion
Now we know how to backup and synchronize local & remote directories with RSYNC along with RSYNC’s benefits and usage. Hopefully, you find this article helpful.
In my next article, I will continue this series of articles which discusses the other synchronization methods of 2 VMs. My tutorial’s final goal will be automatically synchronizing our main VM with our backup VM. Also, we will be discussing dividing our 2 VMs work loads equally. So, if any problem happens to one of our VM, the traffic will be distributed automatically to our backup VM. With that, our application will always be online seamlessly.
Visit our knowledge base page for more tutorial articles. Or, if you don’t have ServerStadium Cloud VM, You can join us for free by registering yourself here.